My goal with this series of articles is to explain everything I’ve learnt about creating HDRIs in order to try and raise the standard of quality of HDRIs shared online.
It’s not difficult to make an HDRI that’s good enough for your own use, but if you want to make really good HDRIs that provide accurate and dependable lighting no matter the use case, you need to thoroughly understand every step of the process and how it will affect the outcome.
I’m only going to cover only the basics here, and then follow up with a number of smaller articles for specific situations in order to avoid going on too many tangents. A list of these articles can be found at the end, though some of the articles will be linked to throughout as well.
Terminology
Before we begin, let’s make sure we understand each other properly. I’ll be throwing around some fancy words that may mean different things in different contexts, so let me clarify what I mean here first:
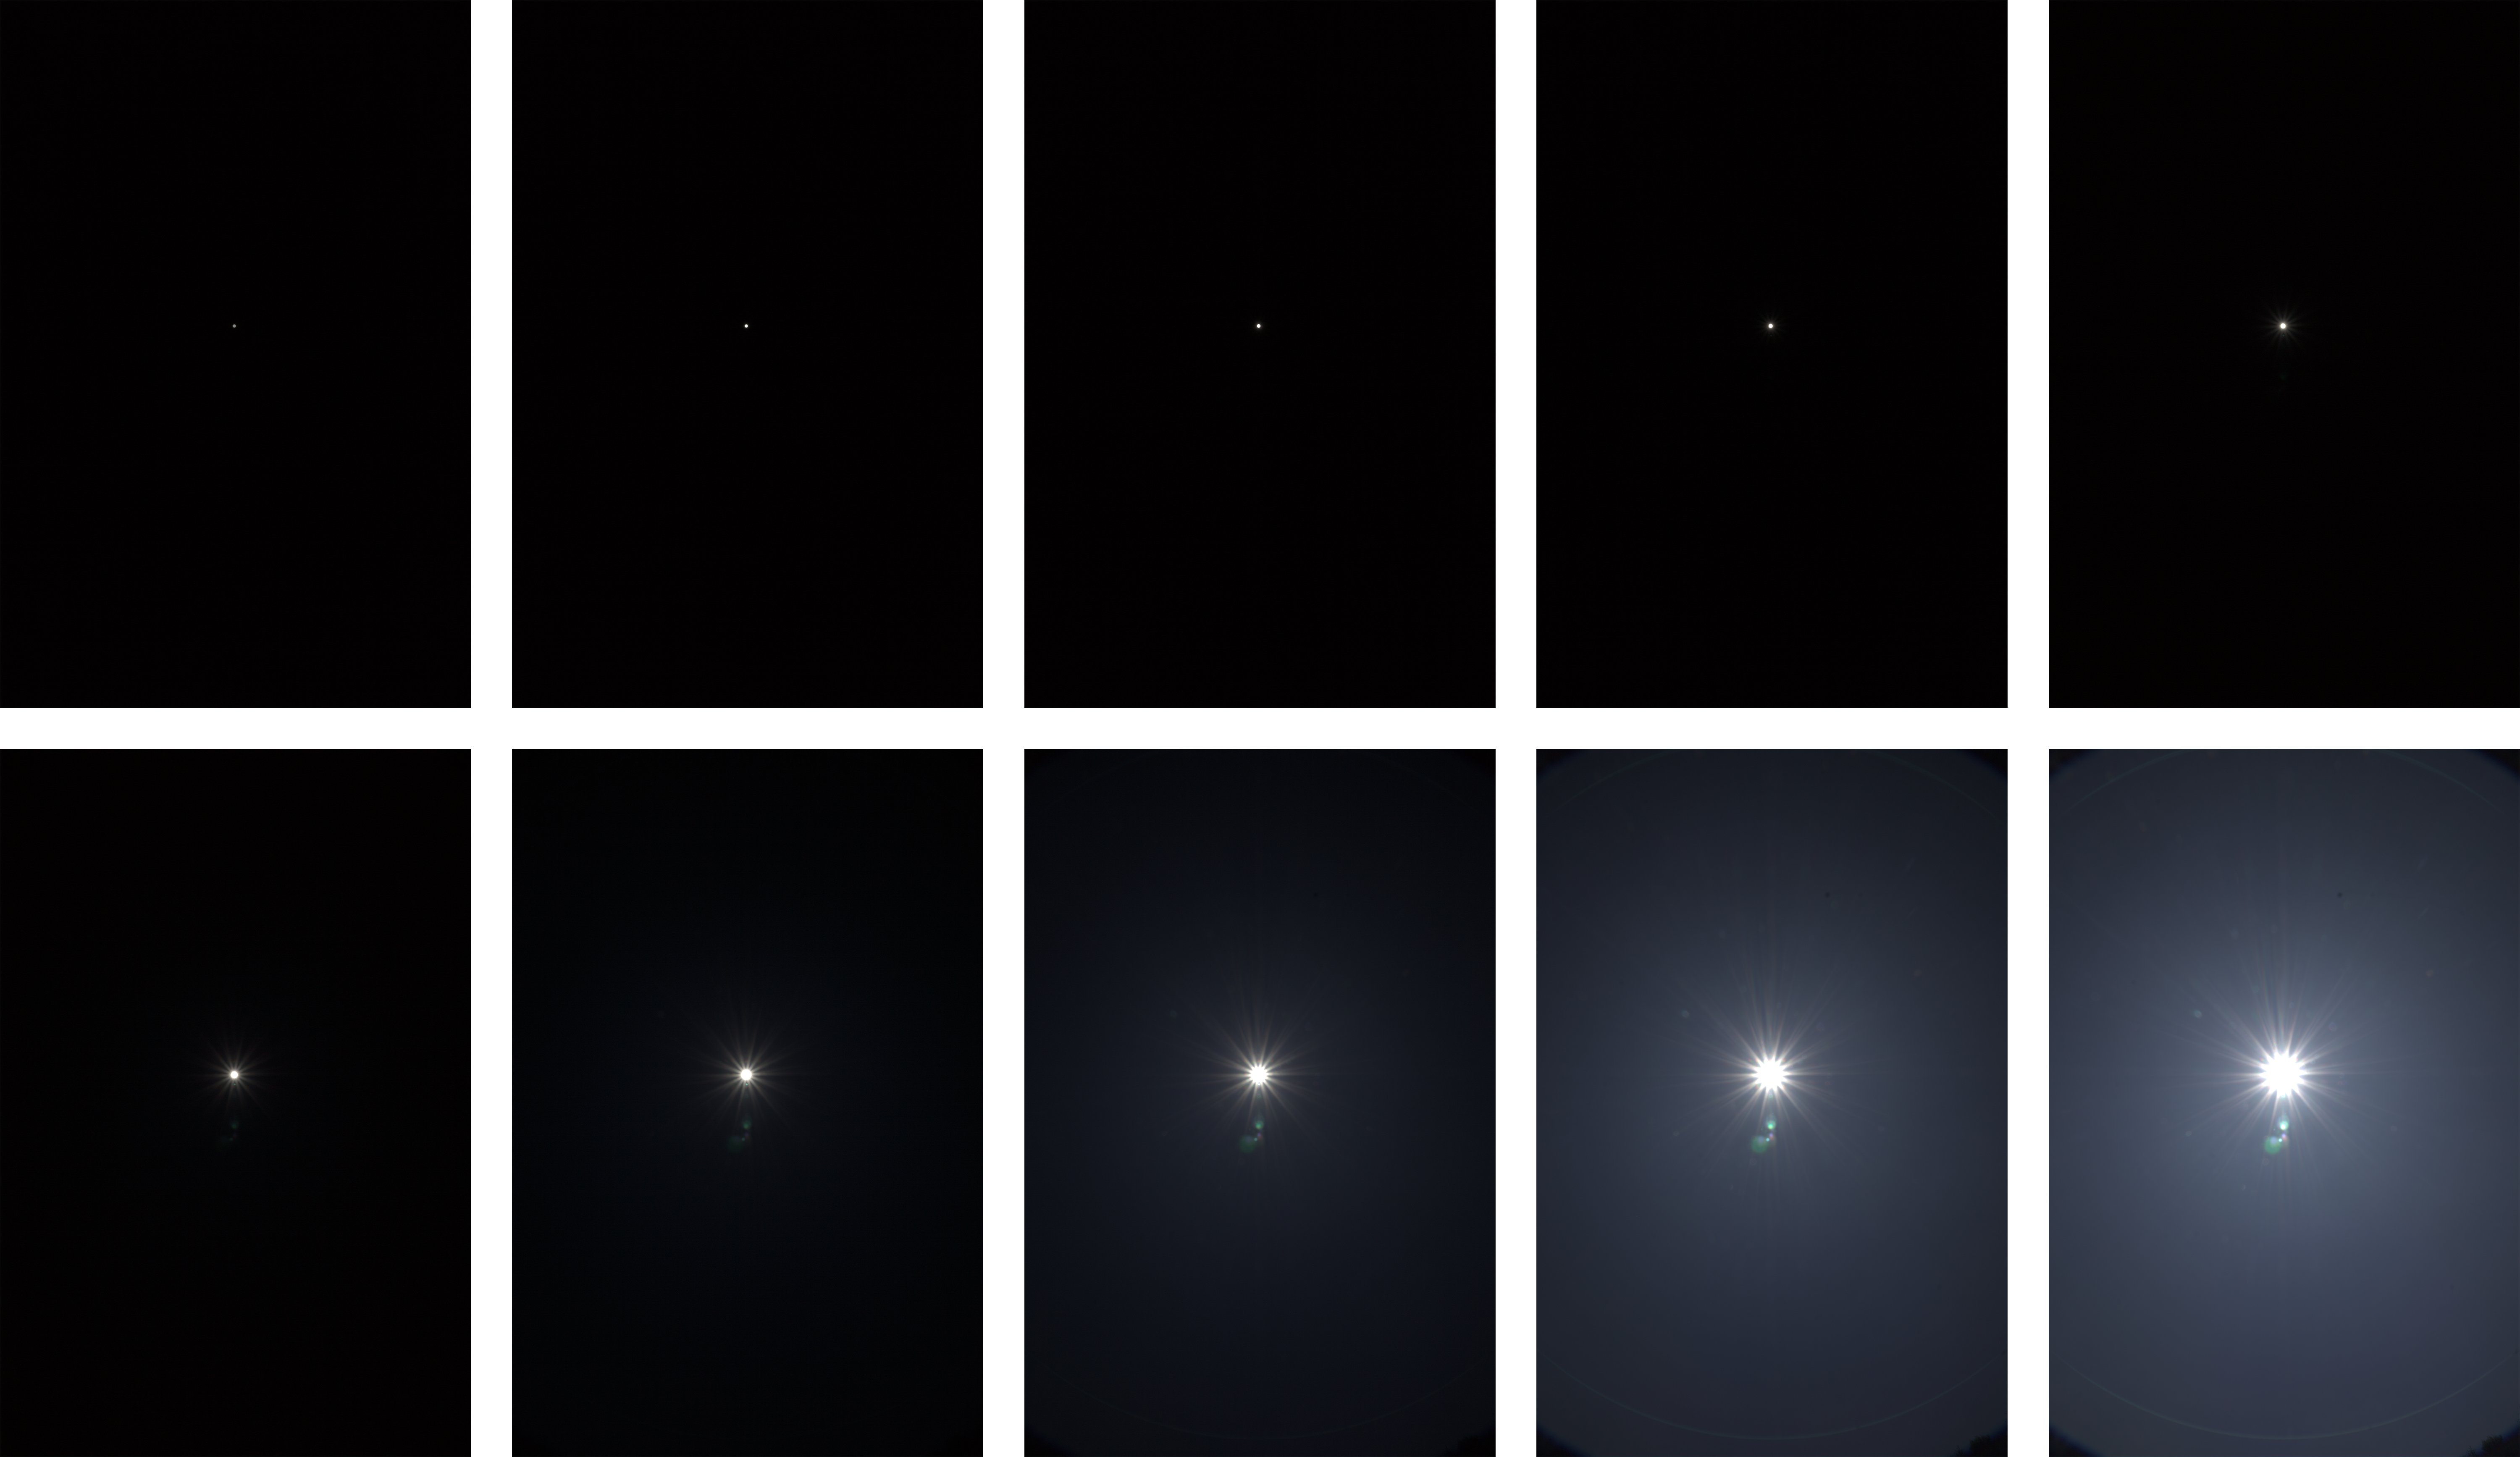
- Dynamic range – The measure of variance in brightness that an image has – basically the difference between an image’s brightest and darkest points. A photo of an overcast sky has a low dynamic range, while a photo that includes both the bright sun on a clear day and the entrance to a dark cave has a potentially high dynamic range.
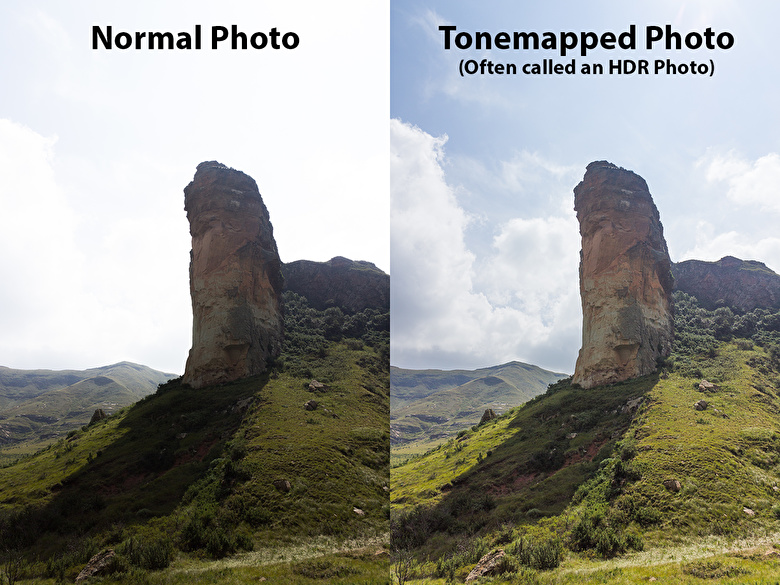
Cameras usually can’t capture all this high dynamic range in a single shot – the sun will be completely over exposed, or the dark cave will have so much noise/grain you won’t be able to discern any details inside of it. Usually both. So in order to capture the complete dynamic range, we use exposure bracketing. - Exposure bracket – a set of photos from an identical point of view with increasing or decreasing brightness. When merged together, taking the best-exposed parts of each one, they create a single image with a much higher dynamic range. Our monitors can’t display this higher dynamic range image, they don’t show anything brighter than “white” (RGB=255). Stitching a panorama when we can’t see all the parts of our images is hard, so to make things easier to see we can do some tonemapping.
- Tonemapping – taking a high dynamic range image (which may have areas that appear completely white on your monitor but are actually brighter than white) and adjusting each area of it so that everything appears well exposed – darkening the brightest parts and brightening the darkest parts. This has the effect of making it look more natural (our brain does this all the time in real life), and is what most photographers refer to as an HDR photo.
For us, this is not the desired final result though, merely a useful tool to make our stitching process easier. Being able to see all parts of a pair of images at once, including bright areas that our monitors otherwise could not display, makes it a lot easier to stitch them together or notice any seams between them, but in the end we actually want a pure 32-bit high dynamic range image that has not been tonemapped in order to produce the most realistic lighting and reflections. Those brighter-than-white regions that our monitors can’t display are actually the most important part as they emit the most light.
With that out the way, we can actually start making an HDRI!
Step 1: Shooting
The process of shooting an HDRI is quite simple in theory, but a number of technological limitations and avenues for human error make it a bit tricky the first few times.
While it’s perfectly possible to create an HDRI with almost any camera (including the one in your phone), in order to get a good result that is unclipped, without major lens artifacts, seams or color issues, and in any situation… you’ll need some fairly specific camera gear:
- A camera that can shoot in raw and has full manual control.
- It also needs to be able to shoot a minimum of either 5 exposure brackets spaced by 3 EVs, or 7 spaced by 2 EVs. Less range than this, and you’ll struggle to capture most scenes.
- A lens of approximately 15mm full-frame equivalent (10mm for APS-C). Other focal lengths can certainly be used, but may introduce some issues or simply be sub-optimal for the pano resolution/shooting speed balance.
- A lens that can accept ND filters – some light sources, like the sun, are brighter than your camera can capture without clipping, even using the darkest exposure settings. An ND filter allows you to capture a much darker image using the same settings. More info about this in the article about shooting the sun.
- A panoramic tripod head to avoid stitching seams caused by parallax.
Rather than cover everything here, this other article goes into detail about the various gear requirements and the implications of not meeting them.
In essence, you need to shoot multiple angles to capture the full 360º view of your environment, with each angle being a sequence of exposure brackets to capture the full range of brightness present (dynamic range).
Each angle needs to overlap with the previous one by at least 30%, so that the stitching software (and you) can use the common areas to match the images together.
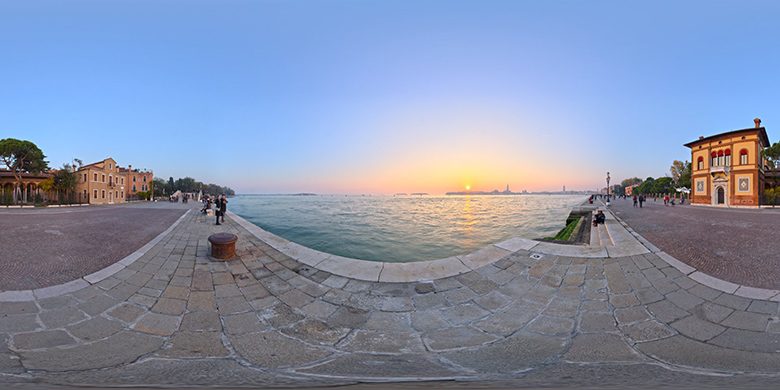
With my 10mm lens on my crop-sensor Canon 600D, I end up shooting 27 angles in total – 9 horizontally, 9 more looking 45º up, and 9 looking 45º down:
For each of these angles I typically shoot between 4 and 7 images in the exposure bracket sequence depending on the dynamic range required, so that’s 108-189 photos in total.
As mentioned, although it’s fairly simple in theory there are a few things you need to keep in mind and watch out for:
- You need to be in full Manual mode to ensure that the aperture, series of shutter speeds, focal distance, white balance, etc… are the same for all brackets. Any variation in these can make stitching harder or end up with a strange result.
- Always shoot in RAW – this is absolutely vital, we need the original sensor data to process ourselves later. If you shoot in JPG, the camera will do all sorts of nasty color adjustments that screw up the accuracy of colors and light intensities.
- Make sure your darkest exposure is dark enough to properly capture the brightest light source. If it’s not, the lighting that the final HDRI produces in a 3D scene will be incorrect (this is called clipping).
- The brightest exposure shouldn’t be too noisy, or require too long of a shutter speed, otherwise shooting the whole panorama may take so long that the lighting has changed significantly by the time you are finished (e.g. during a sunset).
- If you have a zoom lens, make sure the focal length is correct, normally at its widest. This is easier to screw up than it sounds. Trust me :'(
- Make sure you’re actually in focus, especially after changing ND filters where you might accidentally twist the lens.
- Be sure to capture the full 360º view, including the very top and bottom of the pano. No one wants a hole in their sky. If you’re not sure if you captured a particular angle (the human brain tends malfunction when doing the same series of tasks over and over), just shoot it again, there’s no harm in shooting it twice.
Once you’ve shot your panorama, the real work begins…
Step 2: Processing
Cameras and lenses aren’t perfect, and the images they output are not necessarily accurate representations of the real world.
The whole purpose of an HDRI is to provide realistic lighting and reflections for a 3D scene. To do this, we can’t just take the default output of the camera as a true representation of reality, it’s not. The software and settings you use to process the images makes a huge difference in color accuracy as well.
Why don’t we just import the RAW images straight into the stitching software?
There are a few reasons:
- Most stitching software assumes you want a pretty tonemapped output, so their HDR merging algorithms are not necessarily tuned to output accurate results, but rather “pleasing” results. This can be especially problematic with very bright light sources as some of the images will be almost entirely black except for a few pixels, which can confuse the merging algorithm.
- Stitching with typically over 100 huge RAW images is very taxing on your system, which makes the whole process quite slow. Processing and merging the images ourselves first instead makes stitching much quicker.
- We want to do some minor cleanup to the images first, such as removing chromatic aberration and noise.
While there are many, many programs out there to process RAW images into more common formats, not all of them are a good choice for what we want.
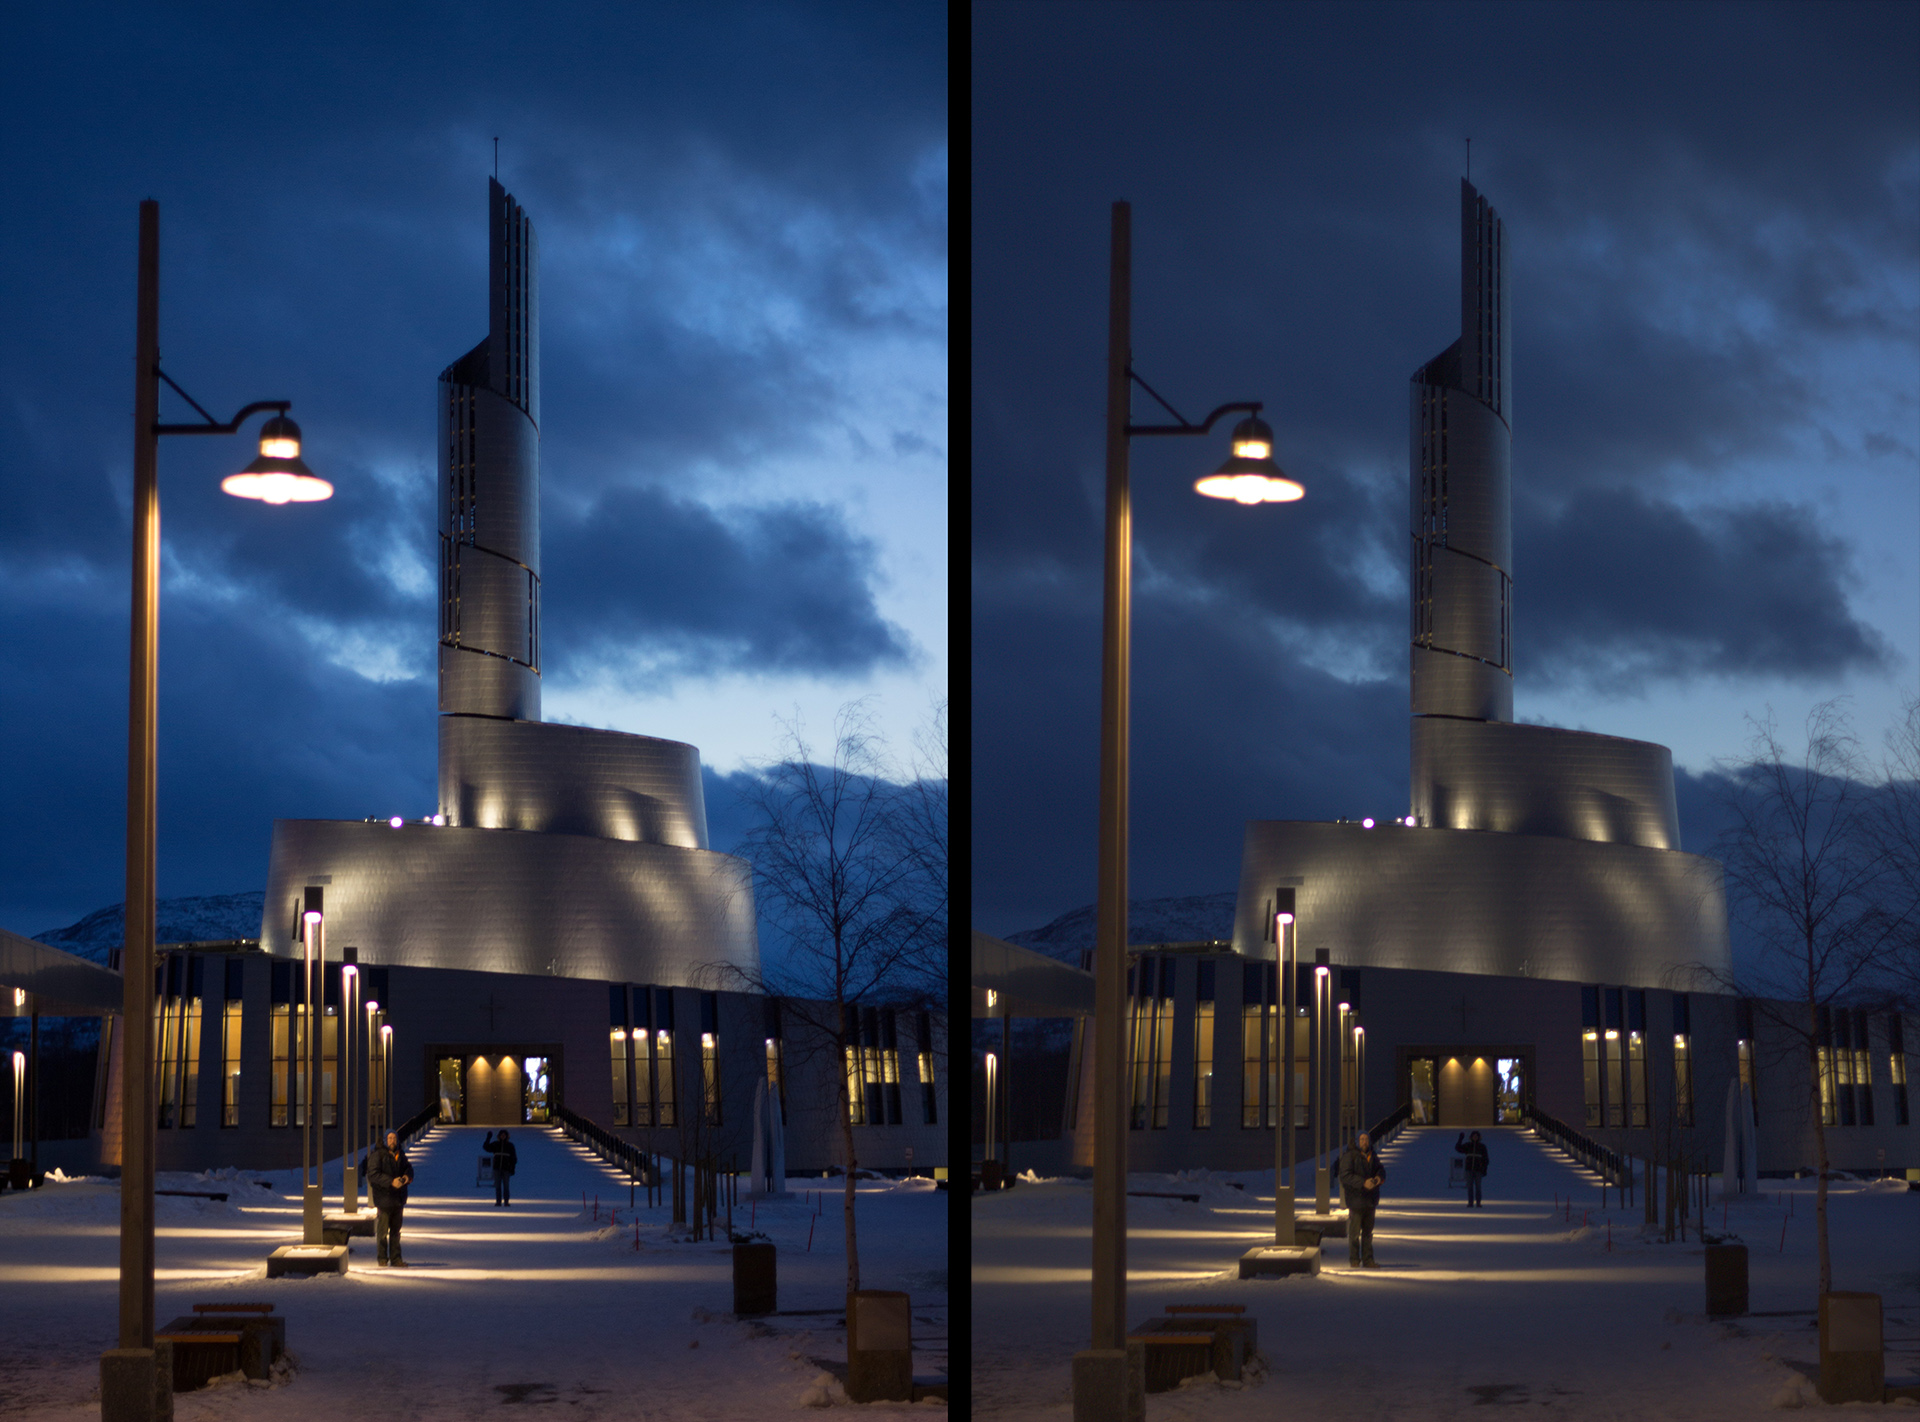
Both images exported with no adjustments and standard color profile.
For example, the most popular choice, Adobe Lightroom, actually does some mysterious RGB curve adjustments to the images even when outputting to 16-bit TIFFs. This is meant to make the images look pretty, but for our purposes makes it impossible to correctly merge the exposure brackets together into a single HDR image in the next step.
This mysterious curve/contrast adjustment makes the brightness relationship between the exposure brackets nonlinear, which will introduce banding where the images are blended together and ultimately produce an unrealistic result, where colors are more saturated than they should be and light sources are either darker or brighter than in real life.
While you can coax Lightroom into giving you a linear output, my current choice is to use RawTherapee instead.
It’s free and open source, has a huge amount of deep technical control over the images while still being user-friendly with good defaults. It can output true linear 16- or 32-bit images and even allows you to calibrate your camera with a color chart if you want to go that far (though the built-in color profiles are already quite good).
Here is the profile/preset I use for processing HDRIs.
It may not be 100% suitable for your camera though, so let me briefly explain what my profile does and doesn’t do in case you need to make your own:
- Disables all brightness and color adjustments in the exposure tab
- Enables Highlight Reconstruction – this should not be necessary and may even be a bad idea, but it can help avoid strange color artifacts in saturated over-exposed areas.
- Minor color noise reduction. No luminance noise reduction. No sharpening.
- Sets white balance to 5400k – the standard I use on all outdoor day-time HDRIs.
- Automatic lens corrections for chromatic aberration only. No distortion correction as the stitching software will calibrate itself for distortion correction anyway.
- Hot pixel and dead pixel filtering
If you do use my profile linked above, be sure to check the Profiled Lens Correction settings and select your own camera and lens instead of mine, and save the profile again for yourself. If there is no built-in profile for your lens, then enable automatic chromatic aberration correction instead.
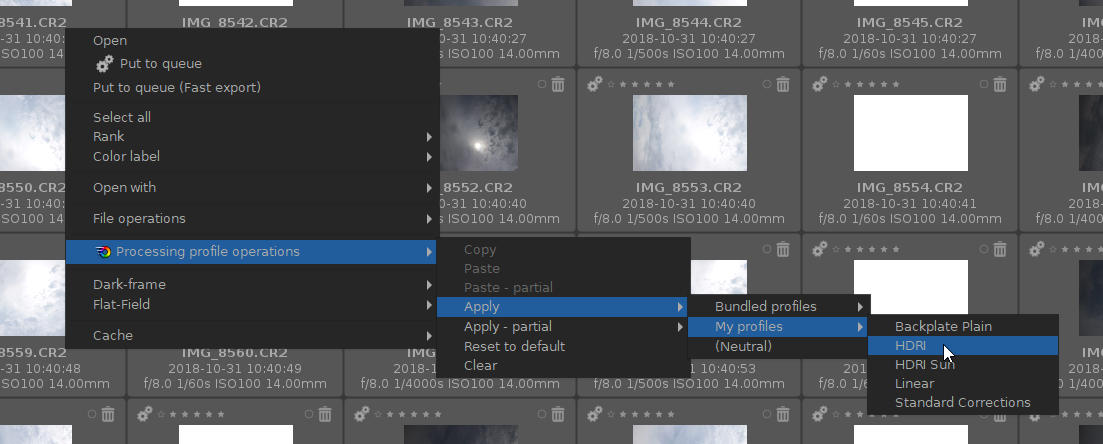
To apply a profile to all your images, simply select them all, right click one of them and choose: Processing profile operations > Apply > My profiles > [the name of the profile].
If you want to make some more changes, such as to white balance, you can double click one of the images, adjust whatever you like, and then click the Copy button at the top right. Then to apply what you copied to all the other images, select them, right click and do Processing profile operations > Paste.
When you’re ready to export them, select them all, right click and select Put to Queue. The images will now be added to the queue tab on the far left of the screen. There you can select the output format, which should be TIFF (16-bit). Don’t use the “float” option, just regular 16-bit TIFF is fine.
Make sure you’re using the latest version of RawTherapee – older versions did not include the original metadata (shutter speed info, etc) in the TIFF files which is necessary in the next step.
Step 3: Merging
Once you’ve exported your 16-bit TIFFs from RawTherapee, we need to combine each exposure bracket sequence into a single 32-bit HDR file.
Here’s how HDR merging works:
Again, there is a lot of software to choose from when it comes to creating HDR content, however most of it is, again, catered towards normal photographers who want an 8-bit tonemapped output.
However what we want is a linear 32-bit output (preferably an EXR file) that was merged linearly using the exposure metadata alone.
A lot of software will use the metadata only as a guideline and instead look at the relative brightness between the images themselves. This causes huge problems when the majority of both images is completely black except for one very small area (the most important part for us), like when shooting the sun or any small bright light source.
Since several of the images are entirely black except for the tiny sun, some merging software assumes they must have very similar exposures, even though the metadata states that they are orders of magnitude apart.
I’ve tried a lot of software and have run into various issues with each, so in the end I created my own solution that I knew would be accurate and dependable.
This may not have been completely necessary, but it gave me full control over the most important part of the process, as well as a greater understanding of exactly what it is we’re trying to do.
You can download my little merging tool here. Be sure to read the instructions as it requires some other software to be installed, and for your exposure brackets to be in a particular order.
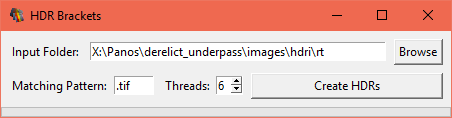
Using it is pretty self-explanatory. You choose the folder that contains the TIFF files that you exported from RawTherapee and hit the Create HDRs button.
A progress bar will be shown at the bottom of the window. Once completed, you’ll see a Merged folder next to your TIFF files. This folder contains both an exr and a jpg folder.
The exr folder contains the sequence of 32-bit images merged from your exposure bracket, while the jpg folder contains 8-bit tonemapped versions of the EXR files to make stitching easier and quicker.
I recommend quickly going through all the JPG files to make sure everything looks correct. If the JPGs look correct then the EXRs are likely fine too, though if you feel like being extra thorough you can open the EXRs in Photoshop/Gimp/Affinity/Krita and play with the exposure to check that the full dynamic range is included and there aren’t any serious ghosting issues.
If you have any trouble using this tool, please shoot me an email so I can help you out or improve it.
Step 4: Stitching
Finally we can start stitching the panorama.
Once again there are some choices of software available, but I have only used PTGui myself so that’s what I’ll cover here. Purchase of PTGui Pro is required to output HDR panoramas, as well as some vital features like masking and viewpoint correction. This costs $240 once-off at the time of writing.
I have tried and retried using the free and open source Hugin many times, but it seems to have a number of major problems. I have not been able to get any usable result from it in any reasonable amount of time. If you have actually managed to create a high quality unclipped HDRI with it, please let me know how in the comments of this post.
So without further ado, let’s stitch the panorama…
4.1. Load the images
Load all the JPG images into PTGui and save the project.
It may ask you what the camera’s sensor size is (1.0 for full frame or 1.5/1.6 for crop/APS-C), and what the focal length of your lens was.
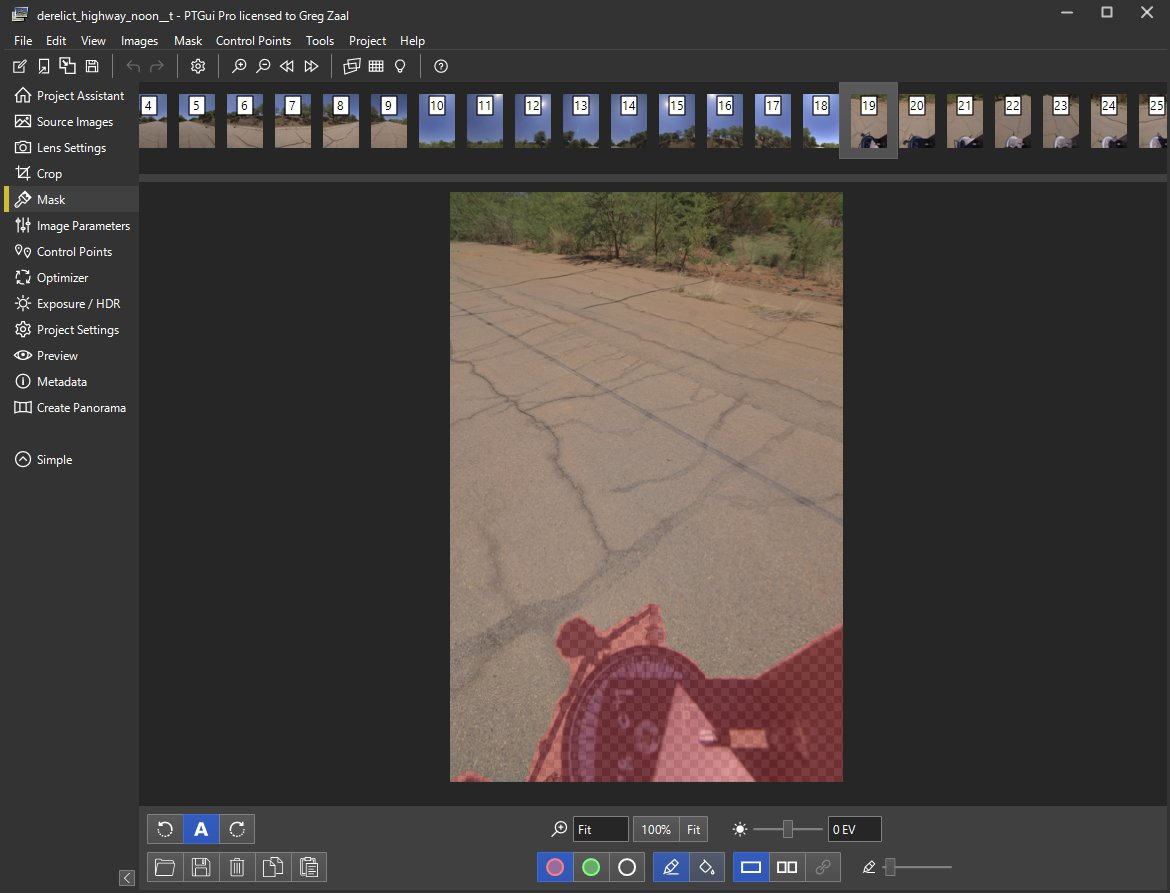
4.2. Masking
Before doing any stitching, you need to mask out anything that may confuse the algorithm, such as the tripod at the bottom of the pano, any moving people, shadows, lens flares, etc.
If you don’t do this first, PTGui may add control points on features that moved around between images, which will create large seams in the final pano.
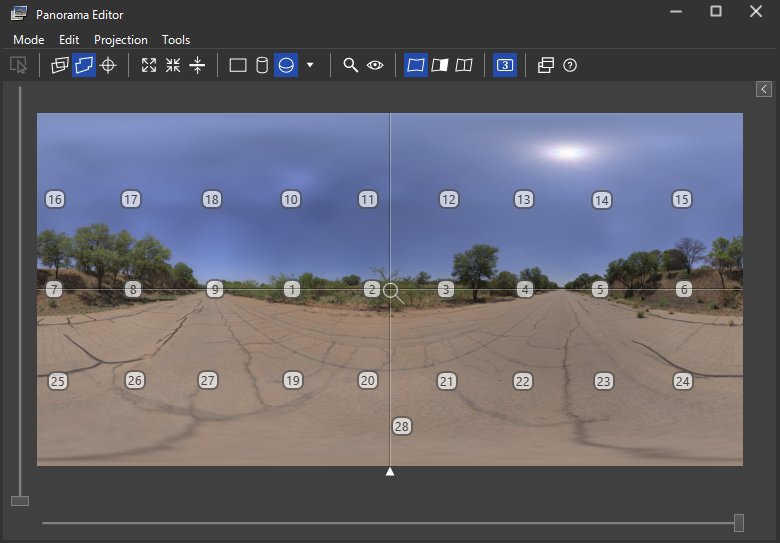
4.3. Align
Now go back to the Project Assistant tab and hit the Align images button.
After a moment or two, you should have something resembling a panorama displayed in the Panorama Editor window.
If PTGui has any trouble finding control points automatically, it will ask you to add some manually. Make sure you have at least 4 pairs of control points between each pair of neighboring images (i.e. 4 control point pairs between image 1 and image 2, 4 pairs between image 2 and 3…).
4.4. Optimize
Some parts of your images may look very similar or have indistinct features, such as multiple windows of a building that look the same, the edges of a wall, or clouds that move slightly between shots.
PTGui can get a bit confused with these, so many of your control points will be quite badly aligned.
To fix this, there are a few steps to take and repeat until you have fixed all the problems:
- Look at the control point table and sort it by distance.
- Delete about 20 control points that have a very large distance detected (these are wrongly detected matches).
- Run the optimizer (F5).
Repeat these steps until all control points in the table have a distance lower than 3.0 and the result of the optimization is Very good.
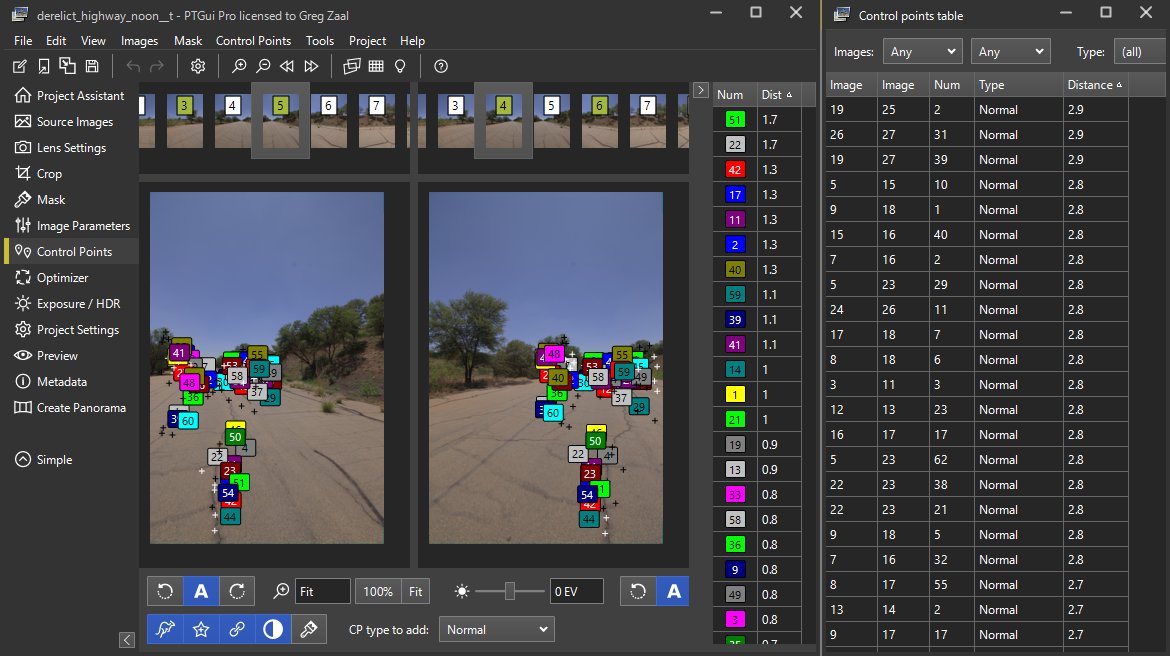
If you start running low on control points, you can generate more from the Control Points menu in between repetitions.
You can also use the Delete worse control points button in the Control points menu, though this will not always delete bad control points if that images pair only has a few left.
4.5. Leveling
The pano may look a bit wobbly now, but this is easily fixed by using vertical line control points.
In the control point editor, select the same image on both sides and add a pair of control points at the top and bottom of some vertical line (e.g. the edges of a room, a building, etc).
Do this for at least 3 or 4 points around all sides of the pano.
If no vertical lines are possible (e.g. in a nature environment), you can try create horizontal lines on the horizon instead, or simply drag the pano around in the editor to level it manually. With no vertical objects in the pano, it’s hard for anyone to tell if it’s unlevel anyway.
You can view the panorama better by using the Preview tab on the left with an appropriate resolution.
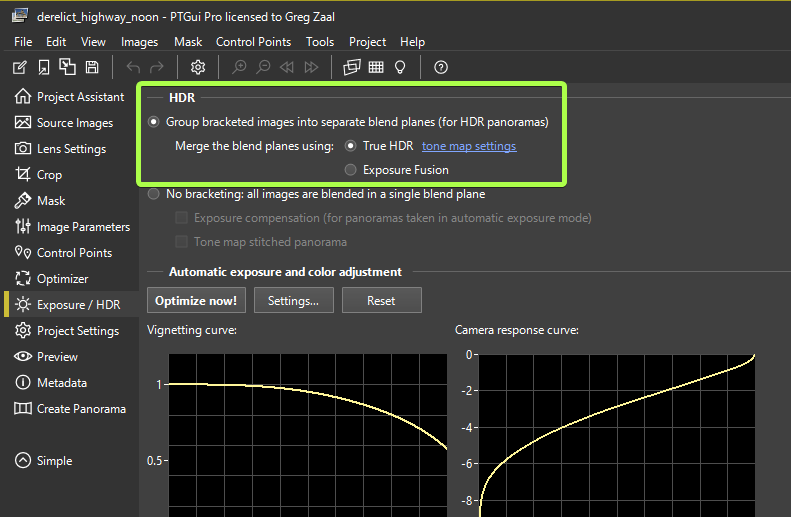
4.6. Swap JPGs to EXRs
This step is only necessary if you used my HDR-Merge tool.
The panorama is basically finished, but we’ve still been using the tonemapped JPGs until now. It’s time to swap out these JPGs for the 32-bit EXRs instead and then output the actual final HDRI.
I’ll be using a python script for this, but you could also just use the Templates system inside PTGui – the downside of the templates system is that control points are not transferred so you won’t be able to make any further alignment tweaks. My script simply swaps the file paths of the JPGs with those of the EXRs, so it’s better to use it if you can.
Firstly, if you don’t already have it you’ll need to install Python 3 and make sure Windows knows to open .py files with Python.
Save your project and close PTGui, then download this python script (right click > Save As) and just drag your .pts project file onto the script.
It will create a backup of the project (“\*__t.pts”) and then replace all the JPG file paths with matching EXR ones.
Now you can open up your project in PTGui again (this will be done automatically if PTGui is installed in the default location) and you should see the EXR files loading in instead of the JPGs.
If you don’t use the script above, also be sure to enable True HDR mode to be able to output to HDR formats (my script does this automatically):
4.7. Export the HDRI
Finally, double check all the output settings are correct (100% optimal resolution, HDR only, no LDR) and hit that Create Panorama button 🙂
Congratulations, you’ve created an HDRI!
You can view this HDRI in a few different ways, my favorite being with LizardQ Viewer, or just Photoshop/Gimp/Affinity/Krita/Blender.
The Next Steps
You now know everything you need to create a basic HDRI, but if you really want to create a quality HDRI that could be published on HDRI Haven, there is still more to learn.
Hello Greg,
thanks for this great how-to tutorial. Excellent in-depth workflow.
I tried downloading your rawtherapee preset but the file is not available anymore. Can you please reupload it?
http://blog.polyhaven.com/wp-content/uploads/2019/02/Gregs-HDRI-profile-for-RawTherapee.zip
Thanks
That exact link still works for me, what error does it give you?
Thanks for your fast reply. It seems like an error in Chrome on my end. Nothing happens when I click the link. Also opening in a new tab does not start any download. I now tried it with Edge and it’s working fine there. Thank you
After looking into the preset I think the issue with the lightroom / rawtherapee contrast is the logarithm decoding. Adobe’s camera raw (used in lightroom and photoshop) somehow “autoadjust” the dynamic range. If you set the contrast -100 you visually get a bit closer to your settings but still the rawtherapee export looks more “out-of-cam” and unprocessed. Might be a good question for the adobe support experts what exactly is going on there.
This may help? https://trentsizemore.com/blog/using-a-linear-camera-calibration-profile/
Also this video is helpful https://www.youtube.com/watch?v=Ql9PVI6oD-Q
Hey, i just try to make a good looking HDRI. Im shootin with a Sony Alpha 7 ii and a samyang 14mm lens.
But every time im doing a hdri it looks simply bad. And i dont know why. Please help me 🙁
Thanks for this post, it’s really helping me make my first HDRIs for VFX. FYI there is a much easier way to process your brackets in open CV with python here:
http://man.hubwiz.com/docset/OpenCV.docset/Contents/Resources/Documents/d3/db7/tutorial_hdr_imaging.html
Being a dabbler in python I peeked into your script, but its a little overcomplicated for what I need and I don’t really want to install blender just to do some light compositing. You can boil the above code down to a few lines and it runs quickly enough. Slapping a PyQt gui on there isn’t much of an issue either.
Thanks for the link 🙂 seems like a nice concise way to do it if your input is known, but I’m still sticking with the Blender method as it handles color management out of the box, and can be easily debugged afterwards since the script saves the blend file alongside the merged images.
Greg, what method are you referring to, when you say “Blender method”? Are you referring to creating a scene in Blender and saving it as an HDRI, or is there some way to get Blender to create an HDRI from images — and if so, is there a link?
Thank you!
Why isnt the lens info added to thge hdri’s? Perhaps per page show lens, fov etc etc
Lens info isn’t relevant for HDRIs as field of view is 360°. It doesn’t matter what lens you use to capture a spherical pano, the resulting FOV of the pano will always be the same.
System is amazing for capturing real world Color & Lighting detail. I got stuck on jpgtohdr. I saw it was updated a couple of months ago. Running ptgui 12.13. Does not set the export settings, backup creation, or swap files. Any insight would be much appreciated.
Hi Robert, I did update the script in June to support PTGui 12
Here’s where I’m at. Doing a python study to figure it out. Thanks. https://youtu.be/JuxdkJf3J2A
Hello Greg,
Thanks alot for all your knowledge so I can shoot my own locations:)
I however still have some issues:
Vissible seams/jumps. Is this mainly an imperfect nodal allignment you think? Control point distance is also mostly larger then 3.
And my HDRI is mostly too dark when exported ( adjust it in PS). Is this because I shoot from light to dark?
And when will you unlock the Quality HDRI knowledge so I could share my HDRI’s:) Thanks!
For a perfect alignment, the majority of your control points should be <1, with a handful between 1 and 3. Never more than 3. The cause of this could be poor pano head calibration yes, or motion in the scene (e.g. leaves blowing in the wind).
The brightness of the export is largely irrelevant, you should adjust it either in PTGui before export or in PS later after checking what renders will look like.
Thanks for the quick reply!. I noticed that my camera position( nodal) was moved so that could explain alot. Allthough the HDRI had some misalignments it still is usable especially for backplate renders.
Thanks!
Hi Greg,
First off, thank you so much for the in depth tutorial. I have developed a nice workflow for my work.
I was wondering if you know why my hdr, using the images you provided for download, is pretty dark? I followed the steps closely, even added the sun shot from the other tutorial. Your original CR2 files are 5 exposures with a 2EV spacing, but Inoticed that the brightest exposure looked like the proper exposure, but not 2EV over, like I would expect.
Whatever the case, after bringing in the two completed exr pano into Affinity Photo, the pano looked dark. I though perhaps it would work properly when bringing it into Blender and using it as an evironment texture, but the scene was quite dark as well. I did notice that the exr sun version I created did add nice directional light and made things a touch brighter, but the scene was still way underexposed in Blender.
Any thoughts would be really appeciated.
Best,
Jeremy
It doesn’t really matter what the images or final HDRI looks like, the goal is to capture the dynamic range and not have anything clipped. Naturally this means most of the images will be under exposed (on purpose). You can easily adjust the exposure/strength of the HDRI at the end before or while using it.
Thank you for the detailed how-to guide. It took me a while to figure out, why my tripod-mounted, timer-started bracket shots have a slight horizontal shift between them. It turned out that my lens’ “optical stabilizer” (“vibration reduction” or “image stabilizer” on other lens and camera body brands) was enabled and that was causing the shots to “move”. After disabling it, the problem was gone. This addition may be helpful for others in the “Shooting” part.
Thank you Greg for your time in putting together all this information. Very informative.
I am making some significant changes to the external appearance of my house and I would like to get an accurate representation of what various materials and colour choices will look like so I can make the right choice.
I have produced a 3D model of the house and I am now researching options that will allow me to produce renderings where the model is affected by the surrounding environment.
An HDRI seems like a good option, however, from reading your posts and other sites, to make an HDRI dome the camera has to be in the centre of the scene. For me, this is not possible as there’s a house in the way!
Is it possible to make an HDRI from photos that are taken linearly as opposed to spherically – if you get my meaning?
My first thought is to use my wide-angle lens (10mm – 24mm) with the camera as close to each wall as possible. I note you recommend a 15mm lens as opposed to a fisheye. Would the stitching software work with this? Unfortunately, my wide-angle lens is cropped, even though my camera is full frame.
If you have any suggestions or tips on how I might make an HDRI image, I’d be very grateful if you could share.
For an HDRI, you want your camera to stay in place. You might get *some* kind of panorama stitched with your idea, but there will be many seams and artifacts everywhere. What you’re asking about seems to be more environment reconstruction related (perhaps with photogrammetry) than suitable for HDRIs/panoramas.
I don’t really understand the value of reconstructing the environment around your house exactly (it will never be perfect anyway), maybe rather mock up a simple environment with some 3D assets and an HDRI sky to fill in the missing background.
Thank you Greg,
Yes, as I wrote the above, I was wondering if HDRI is the right approach. After all, the subject is the house and not the background.
I’ve uploaded 2 images to Google Drive so you can see what I’m going on about. A picture paints 1000 words 🙂 https://drive.google.com/drive/folders/1YSjPMoR0ljMdPPYt_On5rLyUa3fBFXIN
I haven’t put the CGI model into Blender yet. I think my main goal is to simulate the shadow – which I don’t believe is reproduced by HDRIs anyway. As you say, I’ll need to add some 3D assets to cast the shadows.
I might be able to use plains in Blender, attaching photos of the background. Not HDRI, but probably enough for what I need.
Thanks again.
Great post. Really good to share.
Have you tried using ptGui for the merge step?
How I run things:
shoot raw – 7 stops for each angle (4 angles with a fisheye is ideal, but requires the specialist lens).
process in photoshop raw-> tif (remove all contrast and color tweaks)
ptgui merges and stitches.
I output exr.
If it’s too dark I expose up the image in nuke.
While I think PTGui is capable of merging properly these days, I find the workflow of stitching with such heavy files too slow, and prefer to still stitch with tonemapped JPGs.
Hi Greg,
I also use PTGui for the merge step. With decent computer specs, the process is not noticeably slower than with JPGs.
Moreover, PTGui v13 lets you adjust the exposure of the output EXR (e.g. I use absolute exposure mode and make the image 4 EV darker). That way I can use 16-bit lossy compression without numerical overflows at the sun – making the output file much smaller.
PS: Maybe you want to correct the spacing recommendation from 2 EV to 3 EV for exposure brackets in this article, too (like you did here: https://blog.polyhaven.com/camera-gear-for-hdris/)
This post is incredibly helpful! I’ve been struggling with creating realistic HDR environments, and the tips on lighting and texture were exactly what I needed. Can’t wait to try out the resources from Poly Haven!
Thank’s for this great post, it is super usefull.
Why exactly do you shoot with the camera vertical?
That’s just the way most panoramic heads are set up. It’s quicker to rotate the camera horizontally (no need to adjust anything, just turn it) than it is vertically (you have to loosen a knob, adjust the angle, tighten again), so the whole shooting process is faster if you do as little vertical rotations as possible. If the camera itself is vertical, then you have a wider vertical field of view, and don’t need to do as many vertical adjustments.
6 years later and this blog is still the GOAT of teaching how to make an HDRI to someone whos never done one! I got inspired to make HDRIs and bought my own camera and equipment, and now Im making my first ever HDRI thanks to this blog, thanks Greg!
Great post. I wonder is it common and normal practice in CG to use a pure HDRI without directional light to lit a sunny outdoor scene? I am experimenting to setup a lookdev environment for a photorealistic game project. I tried capturing my own HDRI and grey ball, but the grey ball render result seems always more blue than my reference photo, and both unreal and blender and arnold gives basicly the same blueish result. So I wonder if it’s actually diffcult to use HDRI only approach to match greyball rendering with photo for sunny outdoor, if so I would happily accept adding a directional light in the scene and tweak the result to match the photo.
Hi there, for realtime lighting, your engine likely does not support IBL as well as an offline pathtracer does. So, it is indeed common to paint out the sun in the HDRI and add that light with a directional light in-engine.
If your Cycles/Arnold render is more blue than your reference, it is likely because the sun is actually clipped and not emitting as much light as it should be, resulting in a relatively large portion of the scene lighting coming from the blue sky. You can read more about how to shoot the sun and avoid clipping here: https://blog.polyhaven.com/how-to-shoot-the-sun
Hi Greg,
I often refer back to this article, so I can’t thank you enough.
So, I’ve shot thousands of panos at this point, and usually bracketed for the purpose of tonemapping for that “pleasing” looking pano. I have never really tried to create an actual hdri for 3d scenes–ironically, that is why I got into 360 photography–I do 3d graphics as a hobby. Anyway, today I’m really interested in creating some proper hdri’s, so here I am again.
I think the only thing I am unsure of at this point is a good method of determining the range of a scene. I usually sloppily find the middle overall exposure and just run my brackets from that point. I’ve ended up with too many unusable underexposed and overexposed images that way. I think I should try to be more or methodical when I try creating an hdri.
Can I ask what your go-to method is of determining the range of a scene and therefore ev steps?
Thanks again for your time and the awesome articles.
Hi Jeremy, glad I can help!
You have two main goals when choosing an exposure range: Your brightest image should be bright enough to see things (maybe a little brighter than what most photographers would call the correct or balanced exposure), and your darkest image should be dark enough that it doesn’t clip any light sources. You might not always be able to acheive this in a single bracket, so refer to my articles about clipping and shooting the sun for those cases.
I pretty much always shoot with my camera’s max bracket range (5 photos, 3 EVs between). I start by checking what exposure to use for the bright image (usually 1/2s since that’s the bottom point when doing 5x3EVs and ending at 1/8000), and with my camera once you know that you just need to figure out the middle point to start from (1/125).
If 1/2s is too dark, and say you need to do 4s, then I use that 1/2s reference point to do the math in my head for the new starting point. 4s is 3 EVs longer than 1/2s, so my starting point would then be 1/15 (3EVs longer than 1/125). This means my darkest photo would then be 1/1000s with the 5x3EV bracket.
I almost always shoot a test bracket or two to check exposures and clipping, unless I’m certain of the conditions (e.g. outdoor stuff during the day is always the same).
Edit: It’s normal to have many black images in your sequence. Only the brightest one will look correctly-exposed, the rest are just there to make sure you capture the full brightness of the scene without clipping anything.
Awesome, Greg! That makes perfect sense. I think the key that wasn’t sinking in, but I’ve seen you mention several times, is clipping. I’ve tended to just look at the shadows or brightest spots in the actual image and gauge from how those look, rather than using harder data from the histogram or exposure warnings if those are available.
I do want to be able to shoot sunny day hdri’s, so I spent the evening looking for ND filter solutions for the Canon 8-15mm, and it’s not looking good. I’ll probably end up getting a 12-stop for my Sigma 24mm instead. In the meantime, I’ll practice scenes without direct sunlight.
Once again, I can’t thank you enough for your help and generosity. I hope to report back soon that I’ve created a working hdri.
Happy holidays!